Share this
Virtual Exchange Server Backup: What You Need to Know
by Oscar Pineda on Apr 23, 2015 4:27:01 PM
When it comes to Exchange Server backup in a virtual environment, there is a lot you should know. Running a virtual environment allows you to use hardware virtualization software to run multiple, separate operating systems concurrently on a single physical machine. When it comes to backing up an exchange server in a hardware virtualization environment, there are several things you should be aware of before determining which route is best for your company.
According to Microsoft, virtual machine snapshots of an Exchange guest virtual machine are NOT supported. While some hypervisors include features for taking snapshots of virtual machines, which essentially captures the state of a VM while it is running so you can easily revert the virtual machine to any previous state by applying that snapshot to the virtual machine, it is not recommended for server applications like Exchange. You may be wondering why it's not recommended. According to Microsoft, virtual machine snapshots are not application-aware, and using them can have unintended and unexpected consequences for a server application that maintains state data, such as Exchange Server. In other words Microsoft will not support you if you run into problems in the future. For more information, you can read more about Microsoft Recommendations for Exchange Servers in Hardware Virtualization Environments.
Two Options for Exchange Server Backups
There are two primary solutions to get around this issue:
Option one, would be to do Offline Backups. In many cases, backing up offline is not optimal as it requires Exchange servers to be shut down, but lets explore offline backup a little further as this is still an option for some users. Offline Backups are backups of Exchange files and folders when Exchange services are not running. If services are not running, backup software can have exclusive access to database files and can back them up.
Planned offline backups will result in consistent database files. When Exchange services are being gracefully shut down, all transactions are being committed to the database. As a result, databases will be consistent, marked consistent or clean shutdown, depending on what version of Exchange you are running.
Option two, would be to do Online Backups. Online Backups essentially mean that you are attempting to back up a separate Microsoft Exchange Server object using backup software. For this option, you would install backup software like NovaBACKUP on the virtual machine and treat it as a physical machine.
Let's take a deeper dive into Online Backups and the best way to perform Exchange server backups, using NovaBACKUP. When it comes to backing up Exchange Server databases, there are four basic types available (Full, Copy, Incremental and Differential). NovaBACKUP has opted to use Full Online backups of Exchange, which is defined by Microsoft as:
Normal (or Full): The normal backup process backs up the directory or Exchange store in its entirety, as well as the log files. To restore from a normal backup, only one normal backup is needed. A normal backup marks the objects it has backed up so that incremental and differential backups have context. This is accomplished by backing up the entire database and all the log files, and then purging the log files.
Since NovaBACKUP does a full backup of Exchange with the purging of the log files, while Exchange services are running, none of the Exchange services have to be stopped for this backup to complete.
The biggest reason why NovaBACKUP has opted for Full Online Backups of Exchange, is because Microsoft has acknowledged that there are known problems with some versions of mailbox-level backup programs including loss of free/busy data and incomplete restores.
Microsoft website states the following about brick-level backups:
There are several third-party backup programs that can back up and restore individual mailboxes, rather than whole databases. Because those backup solutions do not follow Microsoft backup guidelines and technology, they are not directly supported.
In other words, you are better off doing a full backup. You can read an overview of Exchange Server backup methods on the Microsoft TechNet website.
With that in mind, NovaBACKUP has taken the steps to make it very easy to backup and restore your Exchange Server.
How to Backup and Restore Your Exchange
Server Database Using NovaBACKUP
Step 1: Create a Backup of Your Exchange Server
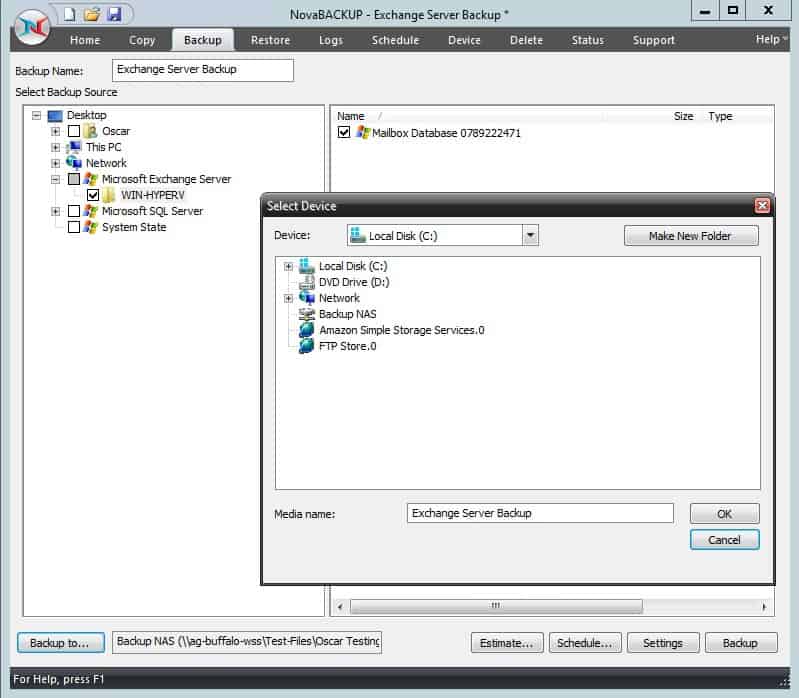
Launch NovaBACKUP and click on the Backup tab. Select the Backup Source, found in the left column of the screen. Towards the bottom under Network, you will see the “Microsoft Exchange Server” plugin. For this example, I will select my Exchange Server Mailbox Database plugin. In the bottom left-hand side of the screen, select Backup to. In this example, the backup device I am using is my “Backup NAS”, the name of my backup script and the backup file is Exchange Server Backup. Click Schedule.
Step 2: Schedule Your Backup
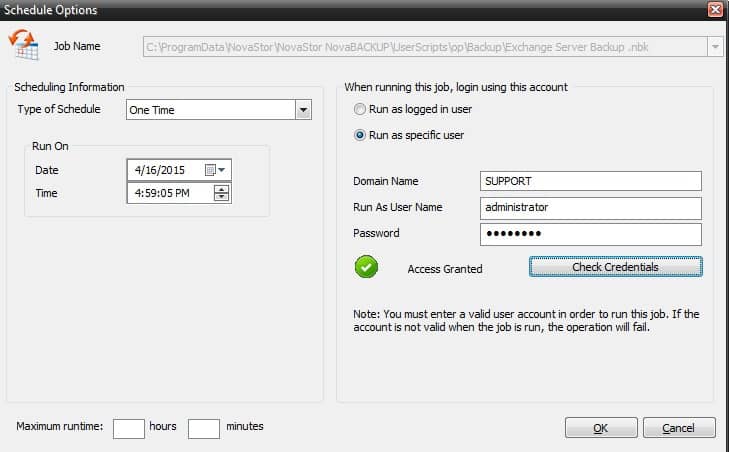
On the Schedule Options screen, you have the option to choose the type of schedule and when you would like to schedule the backup. Setup and verify your credentials and click OK to save your backup schedule.
Step 3: View or Run Your Backup Now
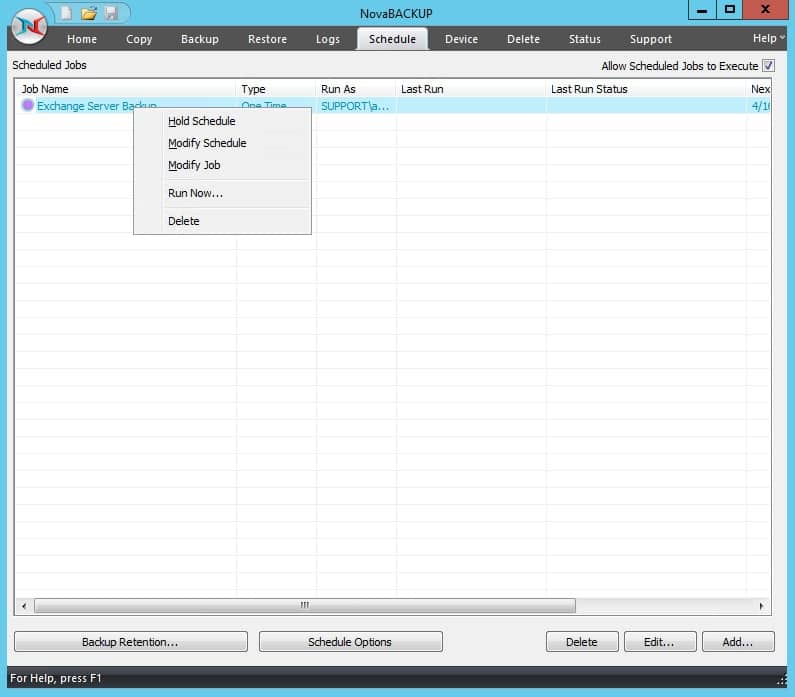
To view your scheduled Exchange Server backup, just click on the Schedule tab and you will see the backup job you just scheduled. If you decide to run your back now, just right-click on your Exchange Server backup job and click Run Now.
Step 4: Restore Your Exchange Backup
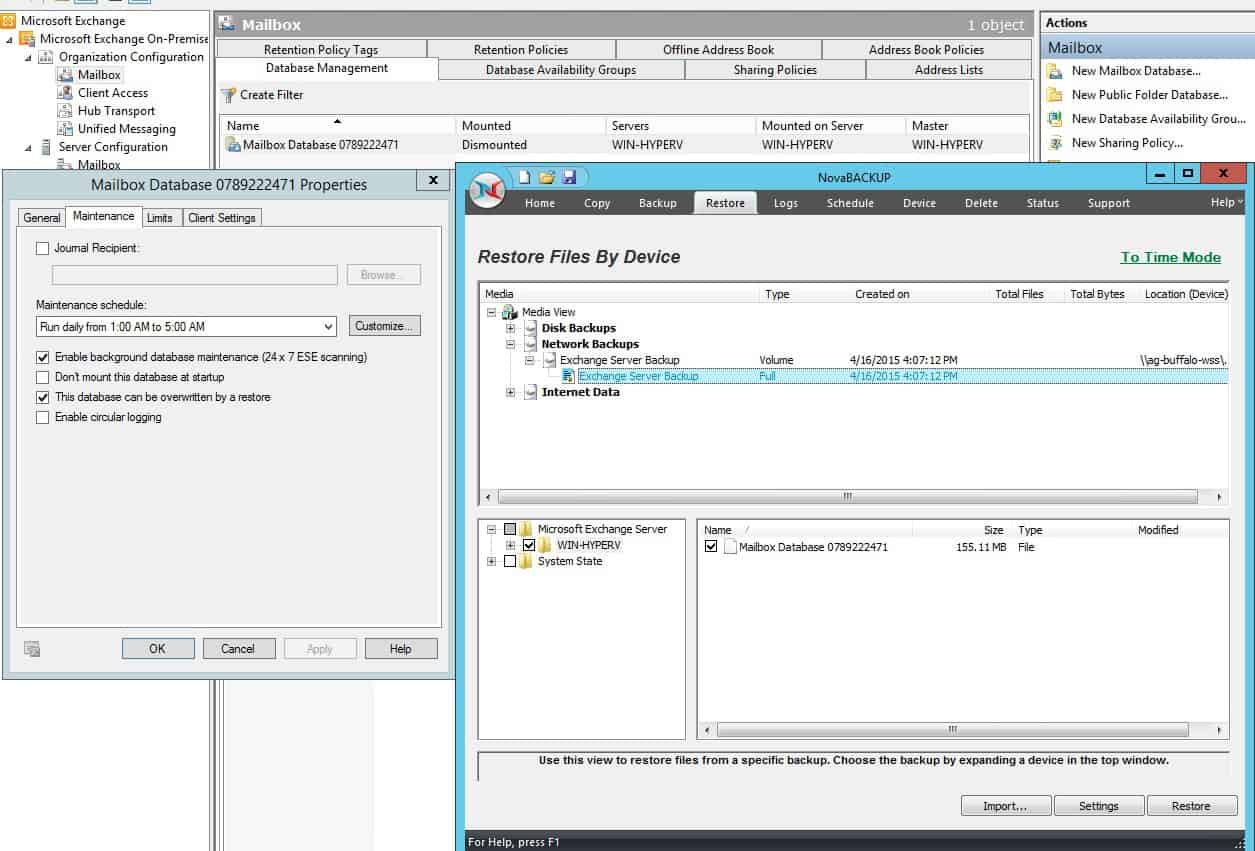
To restore an Exchange server, dismount any database that you want to restore,. Additionally, right-click each database, click Properties, click the Database tab, verify that the “This database can be overwritten by a restore” check box is selected, and then click OK.
As you can see in my Exchange server 2010 example I have “dismounted” Mailbox Database 0789222471 and have checked marked “This database can be overwritten by a restore”. Now open NovaBACKUP, click on the Restore tab, and navigate down to the database you want to restore. For this example, I will be restoring the database “Mailbox Database 0789222471.” Just click Restore to restore this database.
Step 5: Verify Your Restore is Complete
The Status tab will automatically come up, but you can click on this tab at any time to view the progress of your restore. You will see a final status notice indicating that your restore is complete. Once your restore is complete, go back and mount your database. That’s it. You're done with your Exchange Server database backup and restore using NovaBACKUP Business Essentials.
To do a “brick level restore” watch this video using NovaBACKUP’s Single mailbox restore:
Share this
- Pre-Sales Questions (91)
- Tips and Tricks (90)
- Best Practices (37)
- Industry News (37)
- Reseller / MSP (31)
- Security Threats / Ransomware (26)
- Disaster Recovery (24)
- Cloud Backup (22)
- Storage Technology (22)
- Compliance / HIPAA (20)
- Applications (18)
- Backup Videos (15)
- Virtual Environments (12)
- Technology Updates / Releases (7)
- Backup preparation (6)
- Infographics (5)
- Products (US) (4)
- Company (US) (1)
- Events (1)
- Events (US) (1)
- Unternehmen (1)
- February 2026 (1)
- January 2026 (2)
- December 2025 (2)
- November 2025 (1)
- October 2025 (2)
- September 2025 (1)
- August 2025 (1)
- July 2025 (1)
- June 2025 (2)
- May 2025 (2)
- April 2025 (2)
- March 2025 (1)
- February 2025 (2)
- January 2025 (2)
- December 2024 (1)
- November 2024 (2)
- October 2024 (1)
- September 2024 (2)
- August 2024 (1)
- July 2024 (2)
- June 2024 (3)
- May 2024 (1)
- April 2024 (2)
- March 2024 (3)
- February 2024 (2)
- January 2024 (1)
- December 2023 (1)
- November 2023 (1)
- October 2023 (1)
- September 2023 (1)
- August 2023 (1)
- July 2023 (1)
- May 2023 (1)
- March 2023 (3)
- February 2023 (2)
- January 2023 (1)
- December 2022 (1)
- November 2022 (2)
- October 2022 (2)
- September 2022 (1)
- July 2022 (1)
- June 2022 (1)
- April 2022 (1)
- March 2022 (2)
- February 2022 (1)
- January 2022 (1)
- December 2021 (1)
- September 2021 (1)
- August 2021 (1)
- July 2021 (1)
- June 2021 (1)
- May 2021 (2)
- April 2021 (1)
- March 2021 (1)
- February 2021 (1)
- January 2021 (1)
- December 2020 (1)
- November 2020 (1)
- October 2020 (1)
- September 2020 (3)
- August 2020 (2)
- July 2020 (1)
- June 2020 (1)
- May 2020 (1)
- April 2020 (1)
- March 2020 (2)
- February 2020 (2)
- January 2020 (2)
- December 2019 (1)
- November 2019 (1)
- October 2019 (1)
- August 2019 (1)
- July 2019 (1)
- June 2019 (1)
- April 2019 (1)
- January 2019 (1)
- September 2018 (1)
- August 2018 (3)
- July 2018 (2)
- June 2018 (2)
- April 2018 (2)
- March 2018 (1)
- February 2018 (1)
- January 2018 (2)
- December 2017 (1)
- September 2017 (1)
- May 2017 (2)
- April 2017 (4)
- March 2017 (4)
- February 2017 (1)
- January 2017 (1)
- December 2016 (1)
- October 2016 (2)
- August 2016 (3)
- July 2016 (1)
- June 2016 (2)
- May 2016 (6)
- April 2016 (5)
- February 2016 (1)
- January 2016 (7)
- December 2015 (6)
- November 2015 (2)
- October 2015 (5)
- September 2015 (1)
- July 2015 (1)
- June 2015 (2)
- May 2015 (1)
- April 2015 (3)
- March 2015 (3)
- February 2015 (3)
- October 2014 (2)
- September 2014 (6)
- August 2014 (4)
- July 2014 (4)
- June 2014 (3)
- May 2014 (2)
- April 2014 (3)
- March 2014 (4)
- February 2014 (5)
- January 2014 (5)
- December 2013 (4)
- October 2013 (6)
- September 2013 (1)


