Share this
by Bridget.Giacinto on Jan 3, 2014 9:30:50 PM

As part of our tips and tricks series, we will walk you through how to schedule an automatic backup using NovaBACKUP. You will learn how to set up full and Incremental backup jobs to run automatically on a set schedule. This tutorial will not use Wizards, although they are available for you if you want to quickly set up an automatic backup. Wizards will be featured in a future post on how to back up your PC. Click on any screenshot below to view it in full size.
When you first launch NovaBACKUP, click “Go to the application home page” rather than choosing the Wizard option. From here, you will use the tabs along the top of the application to walk through these steps.
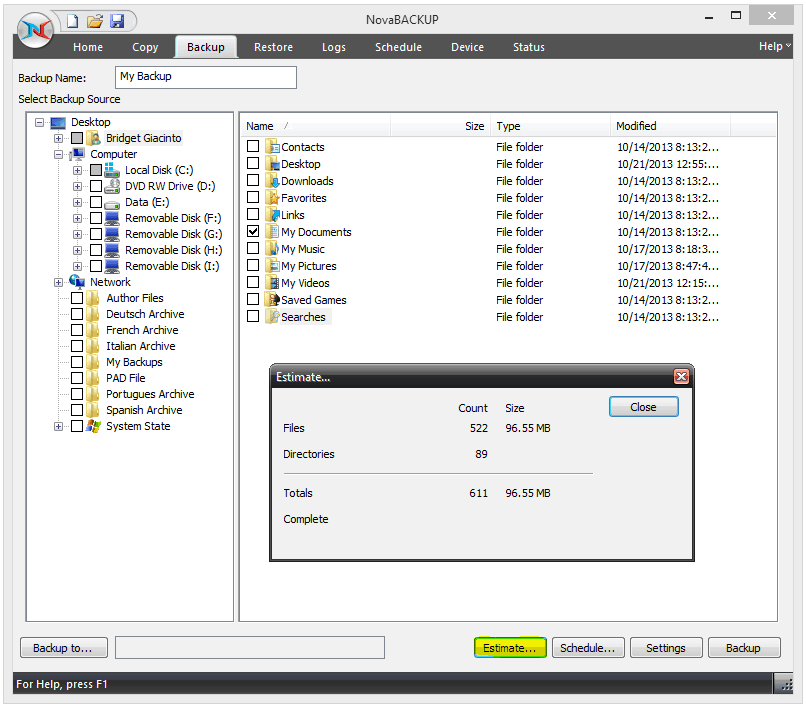 Step 1 – Select what to back up. Go to the Backup tab, and select the individual files that you want to backup. In this example, I’m backing up My Documents. Click the Estimate button highlighted in yellow to determine the file size and the number of files in the folder, so you can ensure that the device you are backing up to has ample space.
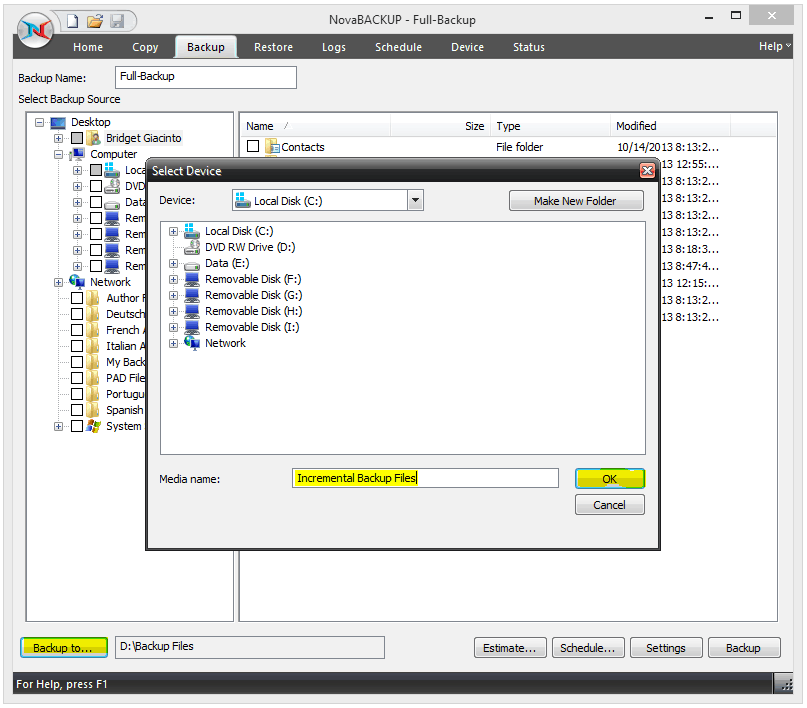
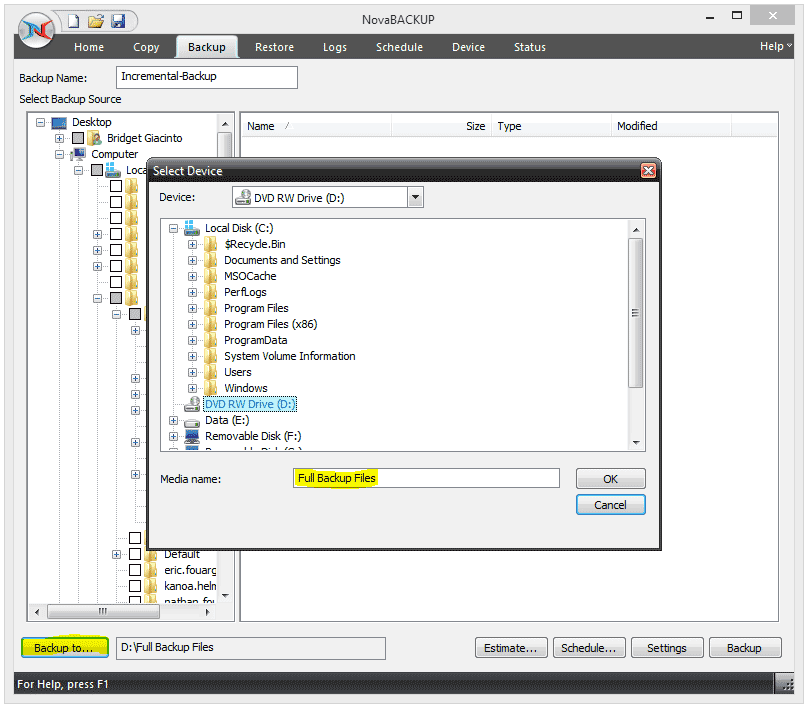 Step 2 – Select where to back up. Click the Backup to button in the lower left-hand corner of the application. Click the plus sign next to any drive to find the location you are looking for. If you do not see your device, please make sure you inserted the CD/DVD or connected your external drive. Once selected, name the media for your full backup and click ok.
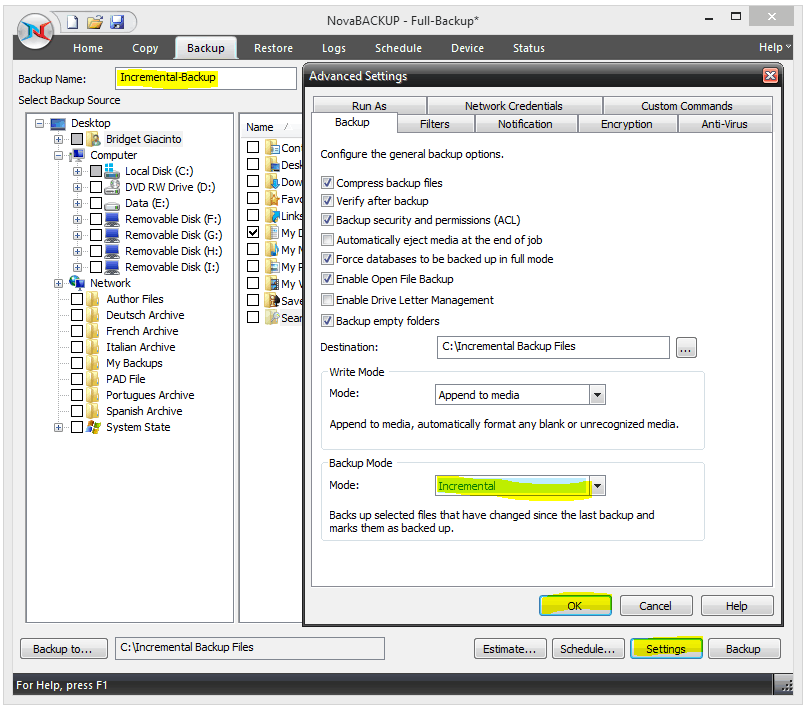
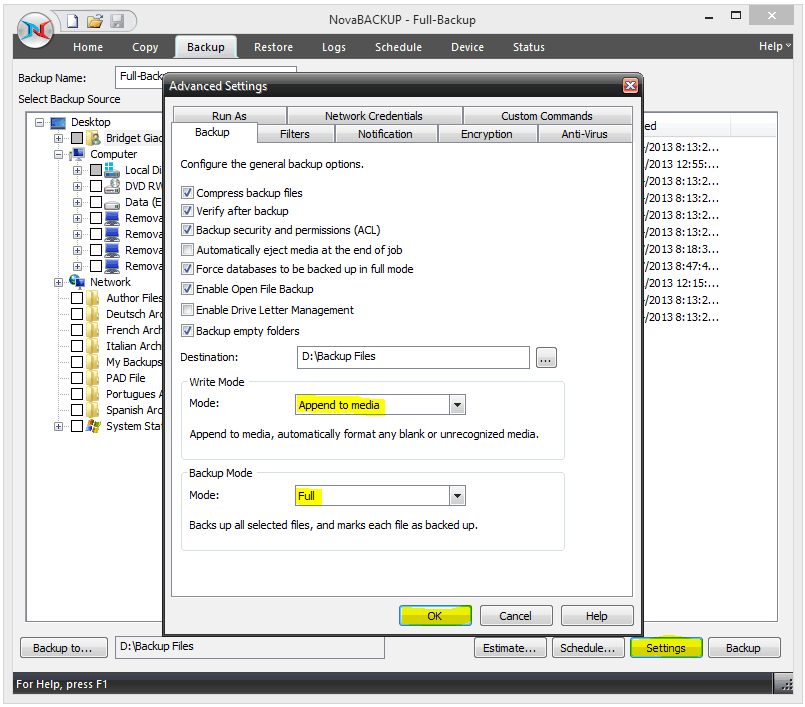 Step 3 – Select backup settings. Click the Settings button in the lower right-hand corner of the application to verify that all of the settings for this backup are set up correctly. From this screen, there are a lot of backup setting options (explained below). The default options are checked for you, but you can make adjustments to fit your automatic backup needs.
Here are the backup options explained:
Compress backup files – this option allows your backups to be compressed to reduce the file size.
Verify after backup – this option verifies your backups to make sure that they were written correctly.
Backup security and permissions – this option backs up Access Control Lists (ACL) which contain file and system permissions and should be selected to maintain system security for business users.
Automatic eject of media at the end of the job – this option will cause NovaBACKUP to automatically eject the media after a backup has completed. For CD or DVD backup, you may want to check this option.
Force databases to be backed up in full mode – this option will allow you to always back up the NovaBACKUP database in full mode so it can be recovered quickly from a single backup.
Enable Open File Backup – this option allows you to back up a file while it is in use. This is made possible by taking snapshot views of files even while they are open.
Enable Drive Letter Management – this option will enable NovaBACKUP to automatically select the correct removable disk device (USB) even if it's designated drive letter changes.
Backup empty folders – this option will backup folders even if they are empty.
Write Mode – this option allows you to choose between Overwrite media or Append to media. There is often a lot of confusion between these two options, so I’m going to try to simplify them.
When you select Overwrite media, you are telling NovaBACKUP to overwrite the backup file every time so that it only contains one file. When you select Append to media a single backup file will contain numerous backups because previous backups will remain in the backup file.
Although the Append to media option will cause the backup file size to be larger, there is a risk involved with the Overwrite media option because if you choose to overwrite your previous backup and your current backup fails for any reason you will not have a usable backup of your files.
I would recommend using Append to Media and then setting up data retention to purge older backups. I will be writing a separate post on how to do this shortly.
Backup Mode – this will allow you to select Full, Incremental, or Differential backup. For this first backup, select Full Backup.
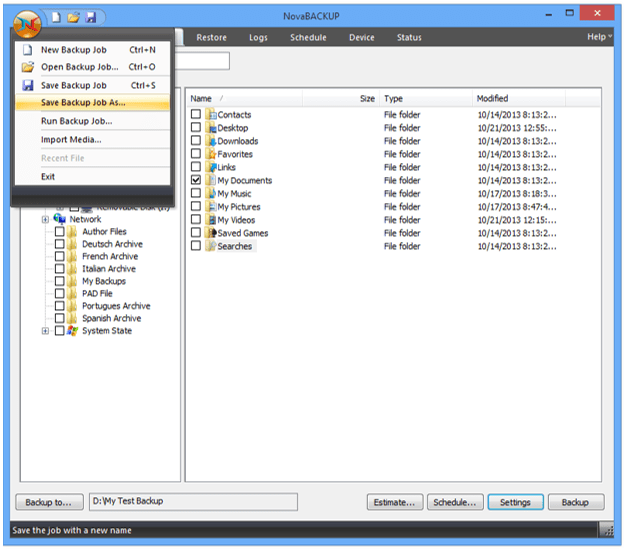 Step 4 – Save your full backup. Click on the NovaBACKUP icon in the upper left-hand corner and click Save Backup Job As. Then name the backup file and click Save.
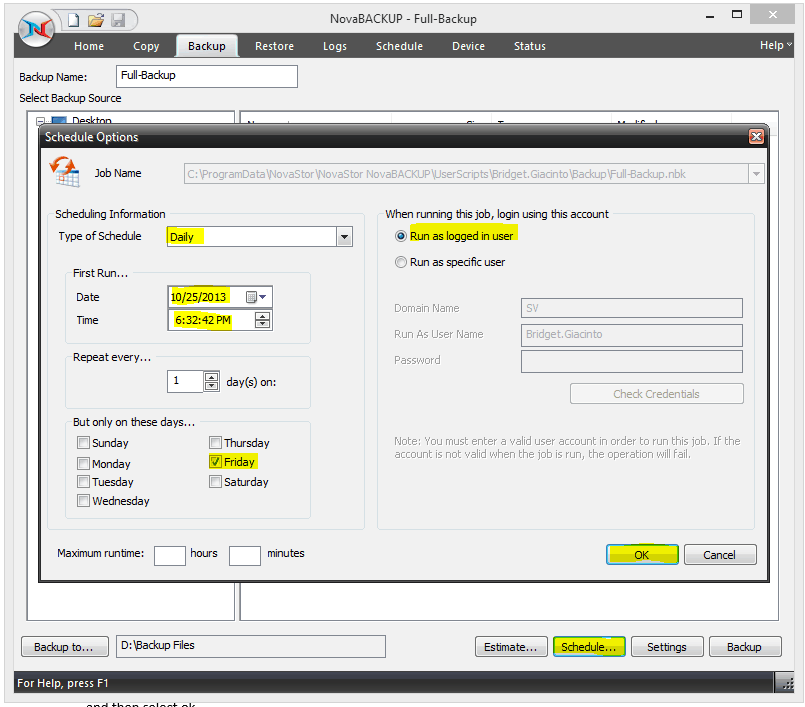 Step 5 – Schedule your full backup. To set the day of the week to schedule your backup, under Type of Schedule, select Daily. Since we selected Full backup, you may only want to run this backup once a week. Select the date you want your automatic backup to start and what day(s) you want it to run, and then select ok.
 Step 6 – Set up your Incremental backup. Click on the Backup to button in the bottom left-hand corner of the application. Update the backup media name to Incremental backup, then select ok.
 Step 7 – Update the settings for your Incremental backup. Change the Backup Name in the upper left-hand corner, and then click the Settings button. Change the mode to Incremental backup and then click ok.
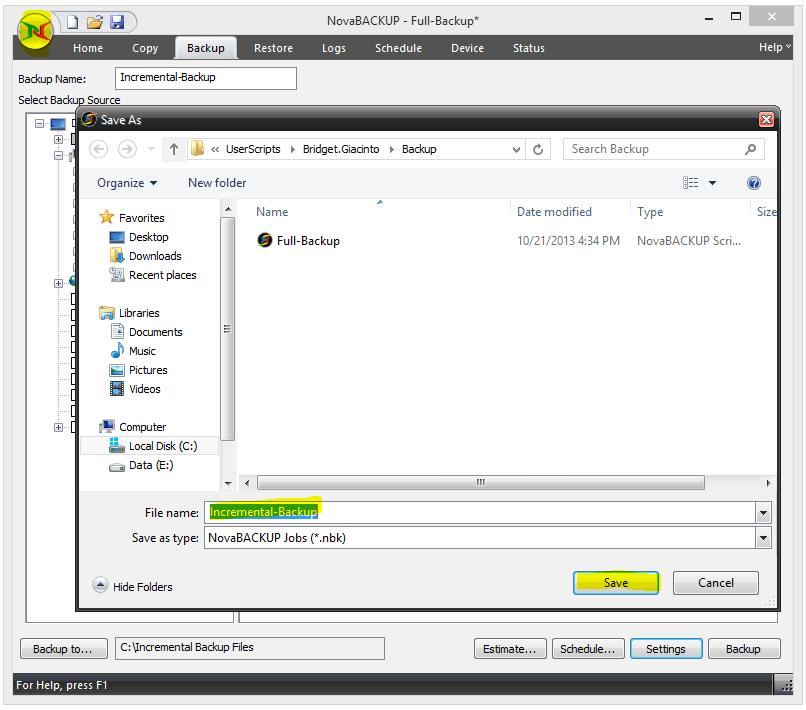 Step 8 – Save your Incremental backup. Click on the icon in the upper left corner, and then select Save as, to save your incremental backup file.
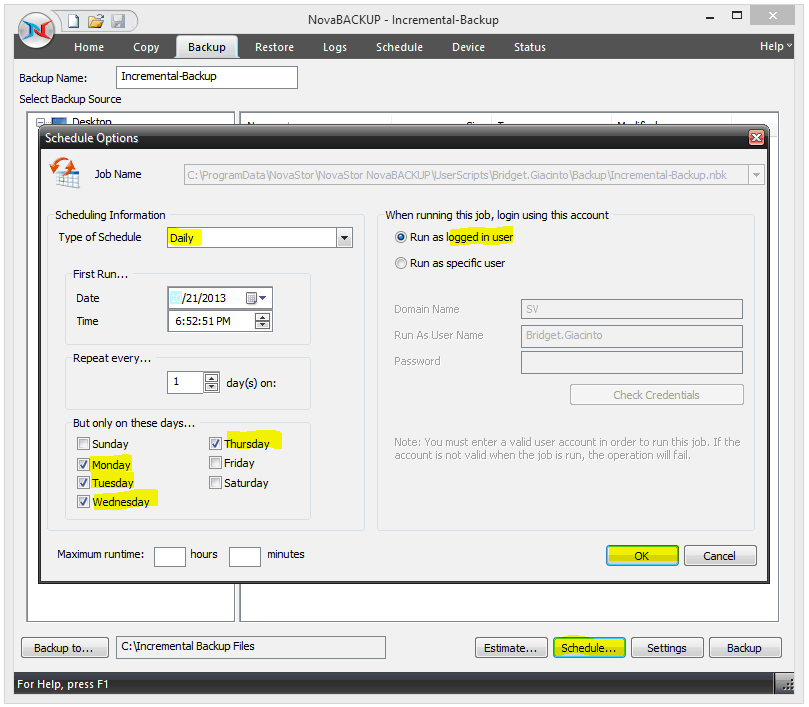 Step 9 – Schedule your Incremental backup. Click Schedule, and then under Type of Schedule, select Daily. Choose the date and time to start your Incremental backups and what days of the week you want it to run, then select ok.
You're done. You have successfully set up your automatic backups so that a full backup runs once a week on Friday and your incremental backup runs daily on weekdays, except Friday.
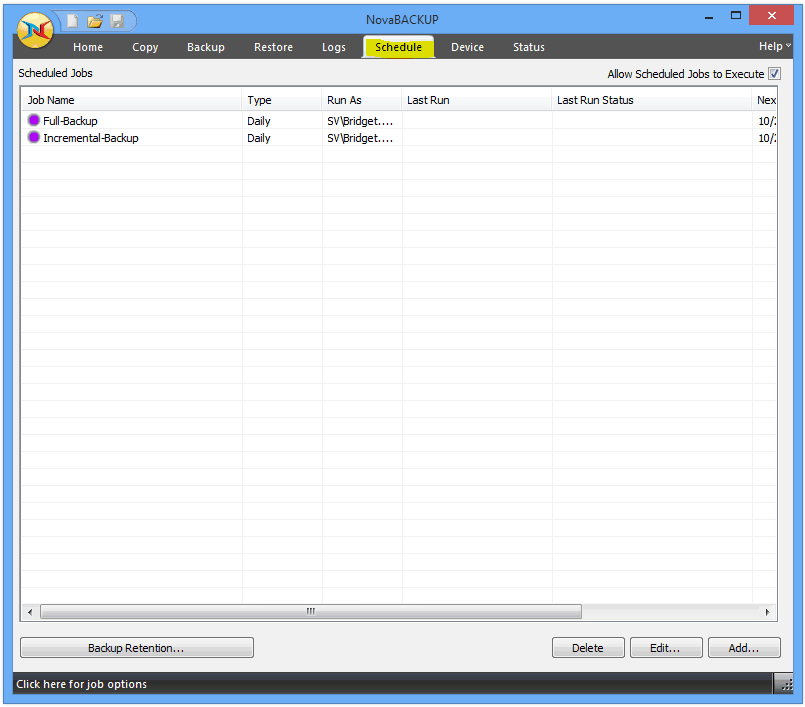 If you go to the Schedule tab you can see that your automatic backups are scheduled.
Share this
